比它還簡單的Win10重裝法,我就沒見過
時間:2019-12-28 來源:互聯網 瀏覽量:
總有男性朋友問起如何搭訕妹子。這就錯了,優秀的男孩子,是自帶磁場的。
尤其是那些會一丟丟電腦知識能解決電腦死機問題的,在哪都是香餑餑。
而其實 90% 妹子的電腦問題都可以通過重啟、重裝係統兩大問題解決。
好多朋友以為重裝係統很難,每次一聽到這個詞就萎了。但學霸君想告訴你,用微軟的原裝工具,裝機就是跟著這篇文章動動手指的事。

你所需要的東西呢,隻有一枚容量大於 4G 的 U 盤。
不好意思,我這真的是傻瓜式教學,連 U 盤都給懶人們挑好了!
建議容量大於4G,因為Windows 10的係統ISO文件是有4G多,所以U盤容量必須要保證能裝下整個ISO文件才行。
#pgc-card .pgc-card-href { text-decoration: none; outline: none; display: block; width: 100%; height: 100%; } #pgc-card .pgc-card-href:hover { text-decoration: none; } /*pc 樣式*/ .pgc-card { box-sizing: border-box; height: 164px; border: 1px solid #e8e8e8; position: relative; padding: 20px 94px 12px 180px; overflow: hidden; } .pgc-card::after { content: " "; display: block; border-left: 1px solid #e8e8e8; height: 120px; position: absolute; right: 76px; top: 20px; } .pgc-cover { position: absolute; width: 162px; height: 162px; top: 0; left: 0; background-size: cover; } .pgc-content { overflow: hidden; position: relative; top: 50%; -webkit-transform: translateY(-50%); transform: translateY(-50%); } .pgc-content-title { font-size: 18px; color: #222; line-height: 1; font-weight: bold; overflow: hidden; text-overflow: ellipsis; white-space: nowrap; } .pgc-content-desc { font-size: 14px; color: #444; overflow: hidden; text-overflow: ellipsis; padding-top: 9px; overflow: hidden; line-height: 1.2em; display: -webkit-inline-box; -webkit-line-clamp: 2; -webkit-box-orient: vertical; } .pgc-content-price { font-size: 22px; color: #f85959; padding-top: 18px; line-height: 1em; } .pgc-card-buy { width: 75px; position: absolute; right: 0; top: 50px; color: #406599; font-size: 14px; text-align: center; } .pgc-buy-text { padding-top: 10px; } .pgc-icon-buy { height: 23px; width: 20px; display: inline-block; background: url(https://s0.pstatp.com/pgc/v2/pgc_tpl/static/image/commodity_buy_f2b4d1a.png); } 閃迪u盤16g高速優盤16g輕薄車載加密u盤16g學生辦公係統u盤cz61 ¥24.9 購買
一、U 盤準備:
1、如果是舊的,一定要先轉移備份;
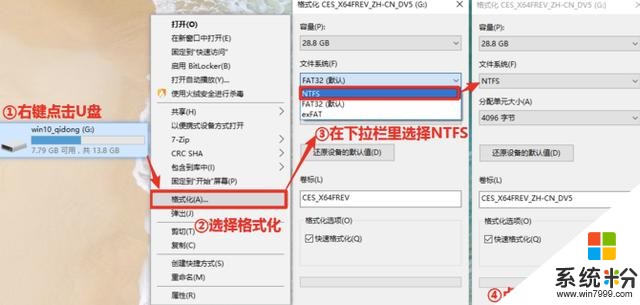
2、購買的 U 盤默認文件係統多半是 FAT32,它不支持超過 4GB 的文件傳輸,先要轉成 NTFS 或者是 exFAT,具體操作如下。
二、下載係統
特別提醒,一定不要去比如係統之家、係統天堂、Win10 之家......多半有內部捆綁,甚至是病毒。
用它們裝機還不如不裝!
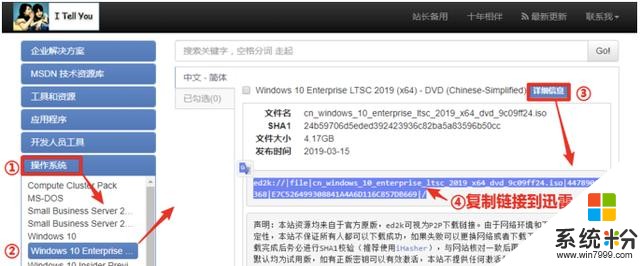
建議大家考慮“ITellYou”或者微軟官網,下載原版原裝係統。
鏈接傳送門MSDN, 我告訴你
三、製作 U 盤
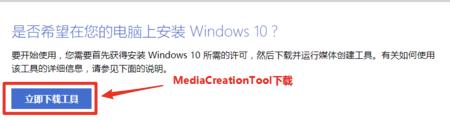
這類軟件多不勝數,個人推薦綠色無毒的:MediaCreationTool。
再次提醒,和下載原版係統一樣,做 U 盤也是有些軟件希望大家少碰或者不碰,容易被捆綁。什麼老毛桃、大白菜、裝機師傅........用微軟原裝的不香不快麼?
微軟原裝 MediaCreationTool 下載地址:「鏈接」
工具都下好後,我們就直接到了下一步,用 MediaCreationTool 製作 U 盤啟動。
1、插入 U 盤並成功識別
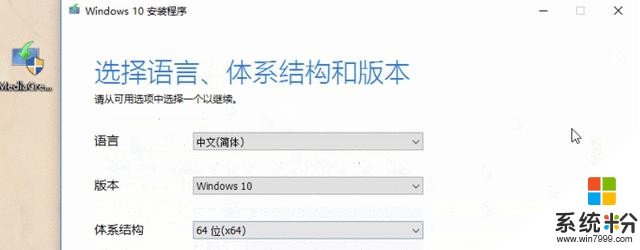
2、右鍵打開MediaCreationTool軟件,依次點擊“接受” ——“為另一台電腦製作U盤啟動”——“下一步”——“下一步(保持默認)”——“下一步(選擇U盤)”——“下載Windows10係統”
直到最後點擊“完成”,整個 Win10 啟動盤就大功告成。
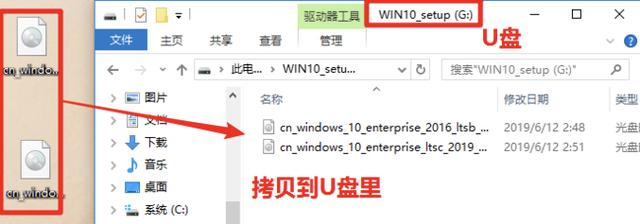
最後將下載好的 Win10 係統 ISO 文件,Copy 到製作好的 U 盤裏。
U 盤製作好了,整個重裝過程至少完成了 70%,簡直快到難以置信!
四、開始重裝
我這裏推薦的是 UEFI+GPT 方式重裝係統,它的重要優點是開機速度賊快。
所以我們要先判斷一下你的硬盤分區方式,如果是 MBR 分區,那就要先轉成 GPT 分區。
不過不用擔心,MBR 多存在老電腦中,是 GPT+ UEFI 模式的可能性很大啦。
磁盤分區是這樣看的:
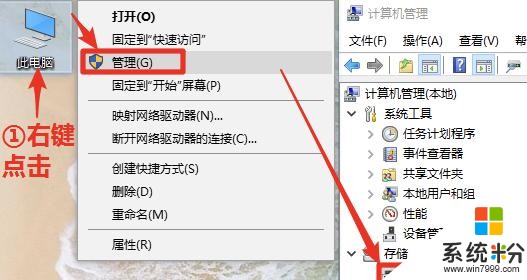
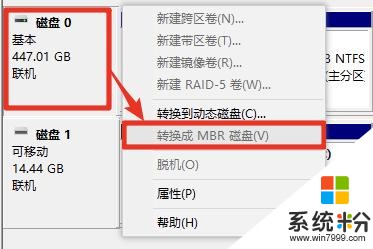
在“磁盤管理”裏找到“磁盤 0”,點擊菜單欄:
如果出現,選擇“轉換成 MBR 硬盤”,那就是 GPT 分區,恭喜你少一步。
如果沒有,當然是 MBR 無疑了。
以上的都做好了,可以搓搓小手,下麵正式進入重裝!
U 盤插入,按下開機,然後快速點擊 F12。
這裏說一下,每個不同的主板都有對應的快速啟動項,我為你找好了:
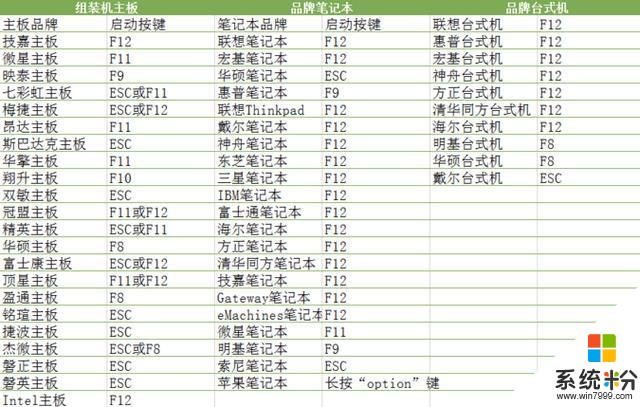
按下後,就會出現如下界麵,我們選擇 UEFI。
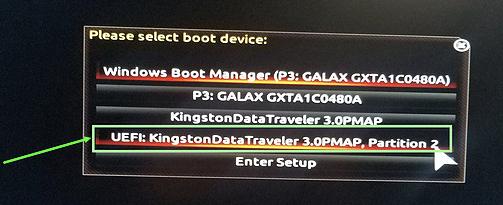
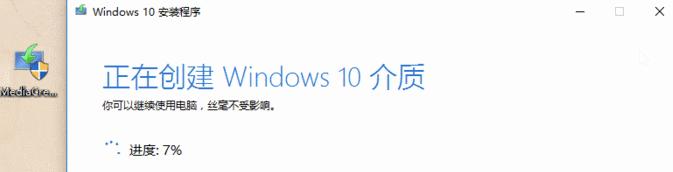
用 MediaCreation Tool 做的 U 盤,按下 UEFI 後等待個 1-2 分鍾,就會跳轉到安裝界麵。
一直點擊下一步就對了。
中間會出現一個激活程序,直接選擇「我沒有產品密鑰」。
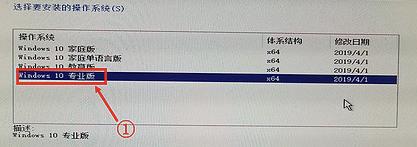
然後選擇「Windows 10 專業版」
一直下一步,中間會讓你選擇自己的係統盤,然後點擊「格式化」。
別緊張,後麵一直都是「下一步」或者「確認」,沒有什麼難關了。
安裝完成後,拔掉 U 盤就是了。
激活的方式很多,為了保命(狗頭),我就不詳說了,大家在度娘都能簡單搜到。
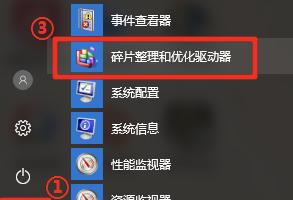
多說一句,如果用的是「固態硬盤」的童鞋們,激活係統後還要去做「碎片整理關閉」,這點在開始界麵也有。
由於整個裝機都基於 U 盤,所以學霸君再給大家推薦 3 款常用的 U 盤。
價格相差不大,那幾塊錢的差價主要是花在了 USB2.0,3.0,3.1 上了,當然數字越高速度越快,裝機速度也就越快。
這是最便宜的 USB2.0:
#pgc-card .pgc-card-href { text-decoration: none; outline: none; display: block; width: 100%; height: 100%; } #pgc-card .pgc-card-href:hover { text-decoration: none; } /*pc 樣式*/ .pgc-card { box-sizing: border-box; height: 164px; border: 1px solid #e8e8e8; position: relative; padding: 20px 94px 12px 180px; overflow: hidden; } .pgc-card::after { content: " "; display: block; border-left: 1px solid #e8e8e8; height: 120px; position: absolute; right: 76px; top: 20px; } .pgc-cover { position: absolute; width: 162px; height: 162px; top: 0; left: 0; background-size: cover; } .pgc-content { overflow: hidden; position: relative; top: 50%; -webkit-transform: translateY(-50%); transform: translateY(-50%); } .pgc-content-title { font-size: 18px; color: #222; line-height: 1; font-weight: bold; overflow: hidden; text-overflow: ellipsis; white-space: nowrap; } .pgc-content-desc { font-size: 14px; color: #444; overflow: hidden; text-overflow: ellipsis; padding-top: 9px; overflow: hidden; line-height: 1.2em; display: -webkit-inline-box; -webkit-line-clamp: 2; -webkit-box-orient: vertical; } .pgc-content-price { font-size: 22px; color: #f85959; padding-top: 18px; line-height: 1em; } .pgc-card-buy { width: 75px; position: absolute; right: 0; top: 50px; color: #406599; font-size: 14px; text-align: center; } .pgc-buy-text { padding-top: 10px; } .pgc-icon-buy { height: 23px; width: 20px; display: inline-block; background: url(https://s0.pstatp.com/pgc/v2/pgc_tpl/static/image/commodity_buy_f2b4d1a.png); } 愛國者(aigo)32GB USB2.0 U盤 U268迷你款 銀色 金屬車載U盤 ¥25.9 購買
這是金士頓的 USB3.0:
#pgc-card .pgc-card-href { text-decoration: none; outline: none; display: block; width: 100%; height: 100%; } #pgc-card .pgc-card-href:hover { text-decoration: none; } /*pc 樣式*/ .pgc-card { box-sizing: border-box; height: 164px; border: 1px solid #e8e8e8; position: relative; padding: 20px 94px 12px 180px; overflow: hidden; } .pgc-card::after { content: " "; display: block; border-left: 1px solid #e8e8e8; height: 120px; position: absolute; right: 76px; top: 20px; } .pgc-cover { position: absolute; width: 162px; height: 162px; top: 0; left: 0; background-size: cover; } .pgc-content { overflow: hidden; position: relative; top: 50%; -webkit-transform: translateY(-50%); transform: translateY(-50%); } .pgc-content-title { font-size: 18px; color: #222; line-height: 1; font-weight: bold; overflow: hidden; text-overflow: ellipsis; white-space: nowrap; } .pgc-content-desc { font-size: 14px; color: #444; overflow: hidden; text-overflow: ellipsis; padding-top: 9px; overflow: hidden; line-height: 1.2em; display: -webkit-inline-box; -webkit-line-clamp: 2; -webkit-box-orient: vertical; } .pgc-content-price { font-size: 22px; color: #f85959; padding-top: 18px; line-height: 1em; } .pgc-card-buy { width: 75px; position: absolute; right: 0; top: 50px; color: #406599; font-size: 14px; text-align: center; } .pgc-buy-text { padding-top: 10px; } .pgc-icon-buy { height: 23px; width: 20px; display: inline-block; background: url(https://s0.pstatp.com/pgc/v2/pgc_tpl/static/image/commodity_buy_f2b4d1a.png); } 金士頓(Kingston)32GB USB3.0 U盤 DT100G3 黑色 滑蓋設計 時尚便利 ¥29.9 購買
比金士頓更便宜的 USB3.1,品牌重要還是速度重要就看大家怎麼選了:
#pgc-card .pgc-card-href { text-decoration: none; outline: none; display: block; width: 100%; height: 100%; } #pgc-card .pgc-card-href:hover { text-decoration: none; } /*pc 樣式*/ .pgc-card { box-sizing: border-box; height: 164px; border: 1px solid #e8e8e8; position: relative; padding: 20px 94px 12px 180px; overflow: hidden; } .pgc-card::after { content: " "; display: block; border-left: 1px solid #e8e8e8; height: 120px; position: absolute; right: 76px; top: 20px; } .pgc-cover { position: absolute; width: 162px; height: 162px; top: 0; left: 0; background-size: cover; } .pgc-content { overflow: hidden; position: relative; top: 50%; -webkit-transform: translateY(-50%); transform: translateY(-50%); } .pgc-content-title { font-size: 18px; color: #222; line-height: 1; font-weight: bold; overflow: hidden; text-overflow: ellipsis; white-space: nowrap; } .pgc-content-desc { font-size: 14px; color: #444; overflow: hidden; text-overflow: ellipsis; padding-top: 9px; overflow: hidden; line-height: 1.2em; display: -webkit-inline-box; -webkit-line-clamp: 2; -webkit-box-orient: vertical; } .pgc-content-price { font-size: 22px; color: #f85959; padding-top: 18px; line-height: 1em; } .pgc-card-buy { width: 75px; position: absolute; right: 0; top: 50px; color: #406599; font-size: 14px; text-align: center; } .pgc-buy-text { padding-top: 10px; } .pgc-icon-buy { height: 23px; width: 20px; display: inline-block; background: url(https://s0.pstatp.com/pgc/v2/pgc_tpl/static/image/commodity_buy_f2b4d1a.png); } 台電(Teclast) 32GB USB3.1 U盤 NEX係列 銀色 金屬防水 便攜圓環高速車載U盤 ¥26.9 購買
是不是很簡單,全部搞下來,我都沒發現有一個步驟是需要智商的!
與其花 50 去電腦店裝個各種捆綁和病毒的係統,為什麼不動動手指跟學霸君操作一下呢。
成為魅力男人,從學會裝機開始!